Hello everyone
my name is Derrick Tindle from the IT Geeks department and I'm
here to show a quick tutorial on how
to create Closed Captioning for your videos on Youtube.
So to start off, there are two different types of CC or Closed Captions
There's Soft Captioning and Hard Captioning.
Hard Captioning is one that cannot be turned off and will always appear in a video
While Soft Captioning is one that can be turned on or off
On Youtube, they used Soft Captioning simply because some may not want to see them
and having the option to turn them on or off makes it very useful for multiple and various types of videos
So to start you process, you simple go the top and click this little arrow that says upload.
This is were you will go to upload your video.
it will bring you to this page were you will see "Select Files to Upload"
button in the center of the screen.
All you have to do is click that.
and then it will bring a little menu that you navigate through your computer to find your video and upload it.
Once you find it, you simple click it and then open.
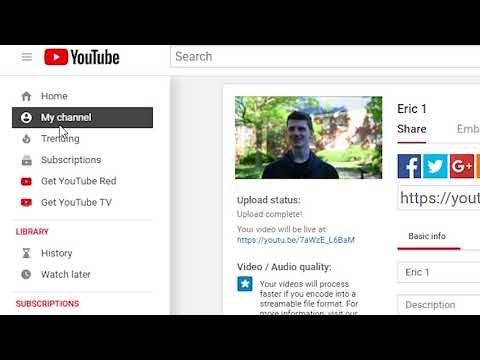
Once you hit open, this next little menu will start to pop up and it begins the upload process, which it shows up here,
and here you can edit any basic information towards the video such as what the video is named.
What people will search to find the video,
what's the description of the video and also whether or not everyone can see it, or just you can see it, or if you want to upload it later
Simple that
So once the video finishes the processing.
You can simply hit the publish button and then it will appear in your video manager, which I will jump to save some time.
Alright, once the video finishes processing, and you click the publish button
and from the spot we need to go to, to create Closed Captioning's, there are two different ways to go there.
The first way is simple down here, were it says "Video Manager"
But some people may click off this screen, and may need to return to edit the Closed Captioning's later, which is at all possible
To do that, you simply click the top three bars on the top left corner, and then "My Channel."
Once you click the "My Channel" it will bring you to your actually channel which has the video we just uploaded.
Next, you go to "Creator Studio"
and then this will bring you to the video manager or one of the sections on the side.
If it's on anything else, then just click "Video Manager" and "Videos".
and here we see the video we had recently just uploaded.
So next you click the little arrow next to edit.
and then you will see all these multiple different options
you just need to click "Subtitles/CC"
That will then bring you to these menu were this little pop come up that says "Set Video Language"
Just set that to English, or whatever Language you happen to be using for the video.
and then set language.
Next it will have a little example video of what we have uploaded
and the "Add New Subtitles/CC" Button.
You wanna click the "Add New Subtitles/CC" and the language you just picked.
Next it will bring you to a screen that says "Select Method"
Here it says "Upload a file, transcribe and auto-sync
These are a little bit tougher then usual, so it's best just to do the "Create New Subtitles/CC"
So you click that button
and it will bring you to the editing menu for subtitles.
Here we see the type subtitles text-box, which basically is were type what words are being said in the video
or whatever you wanting to see in the Closed Captioning's
Here is the video itself, and then down here is a timeline with the audio files, or the audio WAV formate of the videos sound.
So what we wanna do is scroll over
in real time to a spot were our person is talking, and we want to know what to type
So we just click the button
and we should be able to here what he says.
"My favorite thing about online classes is the flexibility"
Alright, so he said my favorite thing about online classes is flexibility
All we need to do is click the type subtitle text-box
and then just type out what he said.
Just going to listen to that one more time just to make sure
"My favorite thing about online classes is the flexibility"
*Keyboard typing*
Just fix any errors that may have posed up
Once you have whatever you typed, you just click the blue button with the plus sign
and it will create this little timeline section, but more importantly it creates this little box down in the corner
So we know he says this from about 12 seconds to 15 seconds
All you need to do is take this little
blue bar on the sides of the box
and scroll it to were it begins and to were it ends
So that way whenever he says it
The CC will pop up and show the text for whatever he said.
So for example
"My favorite thing about online classes is the flexibility"
Alright, so that's all it takes to create subtitles or Closed Captioning's for your videos
All you have to do is the same process for the rest of the video and it will
Drop each box one by one by one in order
and your able to just increase or decrease the duration
and once you do that for the whole video
The video will simply have this little button on the side of it were if people turn it on, it will show these Closed Captioning's right here
or if they turn them off, then it will not show them
and that's all it takes to create subtitles and Closed Captioning's for your videos
So thank you for watching, and again I'm Derrick Tindle with the IT Geeks department and I hope you have a fantastic day and that this was helpful


 For more infomation >> INDOOR LEUZ - "The Supreme" (Prod. Mors) [OFFICIAL VIDEO] - Duration: 2:34.
 For more infomation >> HOW TO: get bigger lips ! talk through video - illumipanda - - Duration: 10:41.
  For more infomation >> Class Welcome Video - Duration: 8:09.

Không có nhận xét nào:
Đăng nhận xét